
How much time you spend :
- To implement a scenario of a project
- To Test the implemented method(Unit Test)
- To Integration testing (to ensure the impact from the other functionality )
is very important in several ways :
- Project time estimation
- To ensure you implement the scenario according to the requirement
- To finish the implementation within the estimated time frame
- To ensure the functionality is not breaking down with the implement of later development
Microsoft provide functionality called “Unit Test” to anyone who has a development knowledge (Developer, QA etc..). But it is not fill the communication gap between domain experts and developers. So Specflow is bridging this gap by providing business readable interface for the given feature.
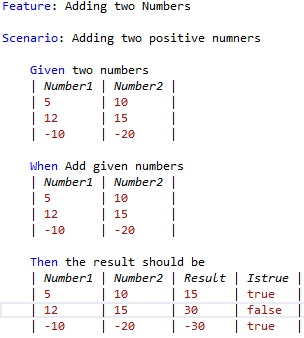
Ex: Below feature has a scenario called Adding two positive numbers. it may have another scenario like adding two negative numbers. if you see the scenario, it has three basic parts Given, When and Then and Tables with test data. and you can additionally add any number of table or sentences to any main key word using “And” key word. So anyone who hasn’t a development knowledge but basic computer knowledge can easily understand the below Test scenario.
Let’s prepare the environment to write specflow in visual studio:
- Install Extension for specflows
VS 2012, Go to Tools => Extensions and Updates => select Online tab => search for “Specflow” , it will show the extension and you can install it on demand. - Create New Unit Test project
Create New Project => Templates => C# => Tests => Unit Test Project - Add References to the project
Tools =>Library Package Manager => Package Manager Console => select the specflow project from “Default Project” drop down list => type type “Install-Package SpecFlow.NUnit” in the Console and Enter. - Go to App.config file of the specflow project and change the test provider to MsTest
<unitTestProvider name=”MsTest” /> - Add “Feature” file and “Step Definition” file to the project and start implementing the scenario => Build the entire solution.
- Go to Test => Windows => Test Explorer and your test scenarios will be there. write click on the feature, you can run it or debug it by adding break point to the step definition file.
Special Notes:
- When you write click on any Given, When or Then and click Go to Definition option or press F12 key VS generate the step definition method and given you to copy. Just paste it in step definition file.
- If you have same Given/When/Then method Names in two different feature files or in same feature different scenarios, it will point to only one step definition method (first one it met)
- We can set this test scenario to run automatically with Build Definitions in Team Foundation Server and can check the result.
Please find the attached sample Feature and Step Definition Content below. Happy Codding….!
